Build a High-Converting HTML Online Quiz for Lead Generation
Learn to build a powerful HTML online quiz from scratch. This guide covers the code, scoring logic, and CRM integration to generate high-quality leads.
An HTML online quiz is, at its core, a lead generation machine built with simple web tech. It allows you to grab valuable user data by dangling a carrot—personalised results in exchange for an email address. But unlike a static PDF download, a custom-coded quiz pulls people in, getting them to actively participate and segment themselves based on their answers.
This tells you their exact needs, what they're struggling with, and how ready they are to buy.
Why a Custom HTML Quiz Is Your Best Lead Generation Tool

Before you even think about writing code, you need to get why an interactive quiz absolutely demolishes most traditional lead magnets. Sure, PDFs and checklists have their place, but a quiz shifts the entire dynamic from someone passively consuming your content to actively participating in it.
This simple shift taps into a powerful human driver: self-discovery. People are endlessly curious about themselves. A well-crafted quiz promises them a little piece of personalised insight, making the trade for their contact info feel way more compelling and instantly rewarding.
The Power of Zero-Party Data
Your standard lead form asks for a name and an email. An html online quiz goes so much deeper. It collects what's known as zero-party data—information a customer knowingly and willingly shares with you. In the world of lead qualification, this is the absolute gold standard.
Think about the difference in the data you're actually getting:
- Standard PDF Download: You get a name and email. You know they're interested in a topic, but you have no idea why or what their specific problem is. It’s a shot in the dark.
- Custom HTML Quiz: You get a name, email, and answers to pointed questions. Suddenly, you can see their industry, company size, biggest pain point, budget, and even their purchase timeline.
This is the kind of insight that lets you segment your audience with surgical precision, right from the get-go. Instead of dumping every new lead into the same generic welcome sequence, you can tailor your follow-up based on their quiz results. The relevance skyrockets, and so do your conversion rates.
A quiz isn't just a piece of content; it's a diagnostic tool. It turns your marketing from a monologue into a dialogue, letting you understand a prospect's real needs before a sales call ever happens.
Engineering as Marketing
Building a simple, focused tool like an HTML quiz is a perfect example of "engineering as marketing." Instead of just writing about solutions, you're building a small piece of one. This approach delivers predictable, qualified demand far more effectively than most content efforts because it provides immediate, tangible value.
This strategy does wonders for building authority and trust. By offering a genuinely helpful diagnostic experience, you position your brand as a savvy expert, making prospects far more receptive to whatever you're selling.
While custom quizzes are powerful, it's smart to explore other high-converting lead magnet examples to keep your strategy fresh. Still, the unique data-gathering muscle of a quiz is incredibly hard to beat.
Building the Quiz Foundation with HTML and JavaScript
Building the actual quiz is where the concept of an html online quiz goes from an idea to a real, working structure on a webpage. Getting the foundation right with clean HTML and well-organised JavaScript is probably the most important part of this whole process. It's what makes your quiz functional today, and easy to update six months from now.
We'll start with a dead-simple HTML boilerplate. The goal here isn't to be fancy; it's to create dedicated containers for each piece of the quiz—questions, answers, the progress bar, and the final results screen. This separation is the key to manipulating the quiz and controlling what the user sees with JavaScript.
The HTML Skeleton for Your Quiz
Think of your HTML as the skeleton. Every bone has a job. The main quiz-container holds everything together. Inside, we have distinct divs for the question-container, the answer-options, and the results-container.
Here’s a complete, copy-and-paste-ready structure to get you off the ground:
<!DOCTYPE html>
<html lang="en">
<head>
    <meta charset="UTF-8">
    <meta name="viewport" content="width=device-width, initial-scale=1.0">
    <title>Marketing Skills Quiz</title>
    <!-- Your CSS file link will go here -->
    <link rel="stylesheet" href="style.css">
</head>
<body>
    <div class="quiz-container" id="quiz">
        <div id="progress-bar-container">
            <div id="progress-bar"></div>
        </div>
        <div class="question-container" id="question-container">
            <h2 id="question-text">Question goes here...</h2>
            <div class="answer-options" id="answer-options">
                <!-- Answer buttons will be dynamically created by JavaScript -->
            </div>
        </div>
        <button id="next-btn">Next Question</button>
        <div class="results-container" id="results-container" style="display:none;">
            <h2>Your Results!</h2>
            <p id="results-text">Detailed results description...</p>
            <!-- We'll add the lead capture form here later -->
        </div>
    </div>
    <!-- Your JavaScript file link -->
    <script src="script.js"></script>
</body>
</html>
Notice a couple of small but important details here. The results-container is hidden right out of the gate with style="display:none;". We’ll use JavaScript to reveal it once the user answers the final question. Also, the answer-options div starts empty. Our script will dynamically inject the answer buttons for each question, which is what makes the quiz interactive.
Setting Up Your Questions in JavaScript
With the HTML structure in place, it’s time to bring it to life with JavaScript. The smartest way to handle your quiz content is to keep it completely separate from the quiz logic. To do this, we'll create an array of objects, where each object represents a single question.
This approach is incredibly efficient. Need to add a new question or tweak an existing one? You just edit this array, not the core JavaScript functions. It keeps your code clean and your content easy to manage.
Storing your quiz questions in a JavaScript array is a fundamental best practice. It decouples your content from your application logic, making future updates faster and less prone to errors.
Each question object needs a few key properties: the question text itself, an array of possible answers, and a way to identify the correct answer. The table below outlines the structure we'll be using for each question object in our quizQuestions array.
Quiz Question Object Structure
This table defines the essential properties for each question object in your JavaScript array, ensuring consistent data handling.
| Property | Data Type | Description | Example |
|---|---|---|---|
question | String | The text of the question to be displayed. | "What does 'A' in A/B testing stand for?" |
answers | Array of Objects | A list of possible answer choices. | [{ text: "Analytics", correct: false }, ...] |
text | String | The text displayed for an individual answer option. | "Analytics" |
correct | Boolean | Indicates if this is the correct answer (true) or not (false). | true |
Using this structure keeps everything neat and makes it simple to loop through the data to build the quiz dynamically.
Now, we can define a simple array of questions for a hypothetical marketing skills quiz.
const quizQuestions = [
    {
        question: "Which of the following is an example of 'zero-party data'?",
        answers: [
            { text: "Website cookie data", correct: false },
            { text: "Answers from a quiz", correct: true },
            { text: "Third-party demographic data", correct: false },
            { text: "User's browser history", correct: false }
        ]
    },
    {
        question: "What does the 'A' in A/B testing stand for?",
        answers: [
            { text: "Analytics", correct: false },
            { text: "Audience", correct: false },
            { text: "It doesn't stand for anything", correct: true },
            { text: "Automation", correct: false }
        ]
    },
    {
        question: "In SEO, what does 'SERP' stand for?",
        answers: [
            { text: "Search Engine Results Page", correct: true },
            { text: "Standard Engagement Rate Protocol", correct: false },
            { text: "Site Engine Ranking Position", correct: false },
            { text: "Search Engine Resource Planning", correct: false }
        ]
    }
];
This structure is clean and totally scalable. The question property holds the text, and answers is an array of objects, each containing the answer text and a correct boolean. This setup is perfect for adding more complex scoring logic later on. As you build out your own content, it helps to understand different question types; for example, you can find helpful guidelines for crafting effective true or false questions which can add variety to your quiz.
With this HTML boilerplate and JavaScript question structure, you now have a solid, organised foundation. We're ready for the next step: writing the logic that displays questions, processes answers, and calculates the final score.
Implementing Scoring Logic for Smart Segmentation
Once you've got the basic HTML structure down, this is where the real fun begins. A quiz without scoring is just a glorified survey. With it, it becomes a powerful machine for segmenting leads automatically. We're not just talking about a simple "right or wrong" tally here. The goal is to build a more nuanced system where the answers people give tell you about their intent, their pain points, and how sophisticated they are.
This logic is the engine that drives personalisation. By assigning different point values or tagging answers with specific categories, you can turn a user's clicks into a meaningful profile. This lets you show them a perfectly tailored results page and, more importantly, drop them into the most effective follow-up sequence.
This decision tree lays out the foundational choices you'll face, from the technical approach to the core JavaScript logic.
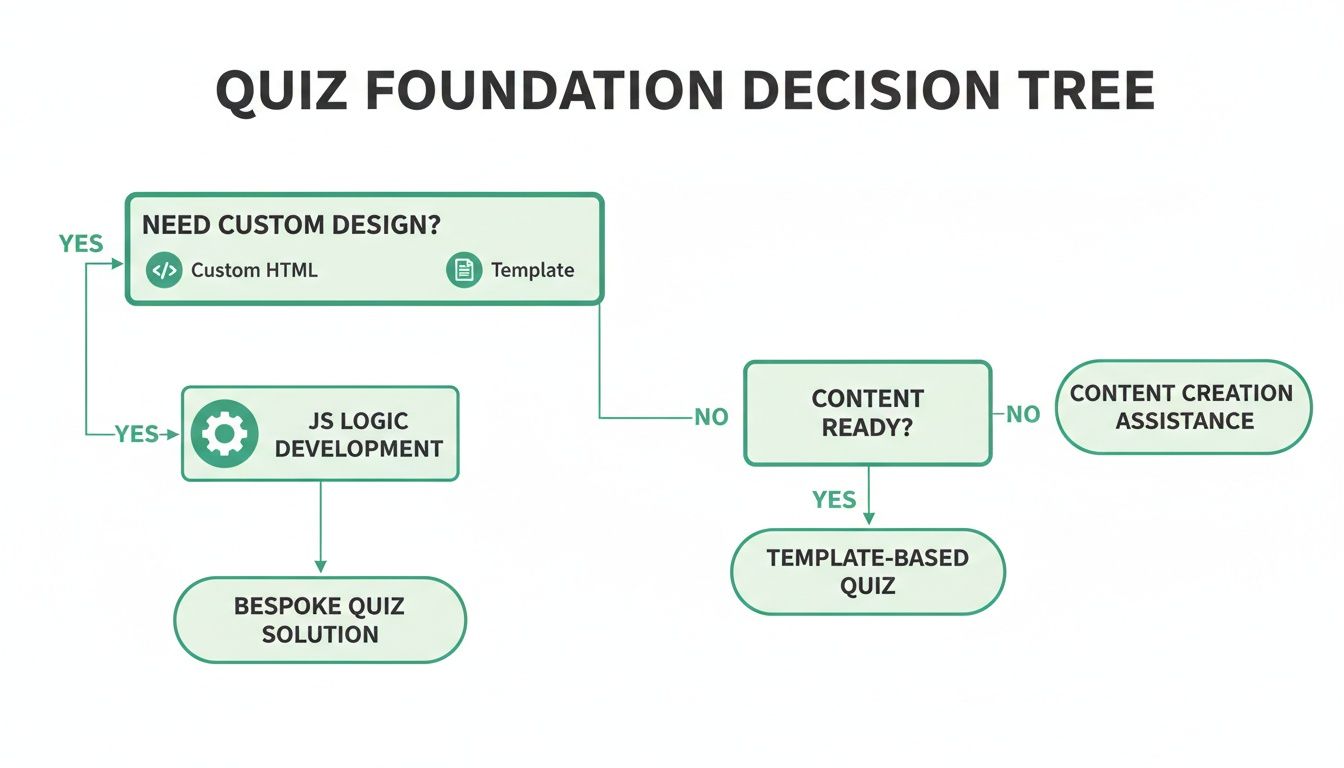
The diagram makes it clear: whether you're coding from scratch or starting with a template, the JavaScript logic for scoring and segmentation is what will make or break your quiz as a marketing tool.
From Simple Scores to Weighted Categories
Starting simple and then ramping up the complexity is a good approach. The most basic method is a single score counter. For every "correct" answer, you just add one to a variable. But we can do much better.
Here’s how you could tweak your question objects in JavaScript and build a function to handle scoring:
let currentQuestionIndex = 0;
let score = 0;

// Updated question object with a 'value' property
const quizQuestions = [
    {
        question: "How do you measure marketing ROI?",
        answers: [
            { text: "We don't track it.", value: 1 },
            { text: "Basic revenue vs. spend.", value: 2 },
            { text: "Multi-touch attribution models.", value: 3 }
        ]
    },
    // ... more questions
];

function selectAnswer(selectedValue) {
    score += selectedValue; // Add the answer's value to the total score
    currentQuestionIndex++;
    if (currentQuestionIndex < quizQuestions.length) {
        showNextQuestion();
    } else {
        showResults();
    }
}
In this snippet, each answer has a value. A user who picks the most advanced option ("Multi-touch attribution models") gets 3 points, while someone just starting out gets only 1 point. This kind of weighted scoring is way more insightful than a simple yes/no. Once they've answered the last question, that total score becomes your key to segmenting them.
100% Free Lead Magnet Audit
Our AI analyzes your website and delivers custom growth strategies in seconds.
Mapping Scores to User Segments
Now you have a score. The next step is to translate that number into a useful profile. You'll want to write a function that checks the score against some thresholds you've set beforehand.
Using our marketing assessment quiz as an example, you could bucket users into a few key groups based on the total score:
- Beginner (Score: 5-9): This person is likely new to the game and needs foundational content.
- Intermediate (Score: 10-14): They've got the basics down but could use some help with optimisation.
- Advanced (Score: 15+): This is a sophisticated user, probably a great fit for your high-end service or a direct sales call.
Here’s what the JavaScript for that might look like:
function showResults() {
    let resultText = "";
    if (score >= 15) {
        resultText = "You're an Advanced Marketer! You have a deep understanding of complex strategies. Here's a guide on scaling your efforts...";
    } else if (score >= 10) {
        resultText = "You're an Intermediate Marketer! You've got the fundamentals down. Let's look at how to optimise your campaigns...";
    } else {
        resultText = "You're a Marketing Beginner! You're just starting your journey. Our foundational bootcamp is the perfect next step for you.";
    }
    // Code to display the results container and resultText
}
This bit of code is the heart of your lead qualification engine. That resultText isn't just for showing off on the results page; the segment itself ("Advanced Marketer") is a critical piece of data to pass to your CRM. Being able to score and tag leads inside your marketing tools is a game-changer. If you want to go deeper, you can see how lead scoring in HubSpot can automate this whole process.
Key Takeaway: The whole point of quiz scoring isn't just to get a number. It's to turn that number into a business-relevant category that tells you exactly what to do next with that lead.
This kind of segmentation lets you follow up with hyper-relevant content. A "Beginner" might get an email sequence with introductory guides. An "Advanced" lead? They could be routed straight to a senior sales rep for a personalised demo. This is how a simple HTML quiz transforms from a piece of content into a predictable system for filling your pipeline with high-quality, pre-qualified leads.
Capturing Leads and Integrating with Your CRM
Alright, this is the moment your HTML online quiz transforms from just a fun piece of content into a proper lead generation machine. You've hooked the user, calculated their score, and figured out which segment they belong to. Now, right before you reveal the results, you ask for their details.
This isn't a random placement. Gating the results behind a form is a classic, proven tactic. Why? Because the user is at their peak moment of curiosity. They've invested time and are dying to know their score.
The key is making this feel like a fair trade. You’re not just grabbing an email address; you're offering personalised insights they just worked to uncover. This value exchange is everything for building trust and getting them to actually hit submit.
Structuring the Lead Capture Form
Let's plug a simple but effective lead form right into our quiz. We'll make it appear only after the final question has been answered, tucking it inside that results-container div we set up earlier.
Here’s the HTML for the form itself. Notice the use of handy HTML5 validation attributes like required—a simple way to make sure we don't get junk data.
<!-- This goes inside the results-container div -->
<div class="lead-form-container" id="lead-form-container">
    <h3>Get Your Full Results & Personalised Tips!</h3>
    <form id="lead-form">
        <input type="text" id="name" placeholder="Your Name" required>
        <input type="email" id="email" placeholder="Your Email" required>
        <div class="consent-container">
            <input type="checkbox" id="consent" required>
            <label for="consent">I agree to receive marketing communications.</label>
        </div>
        <button type="submit">See My Results</button>
    </form>
</div>
This form is dead simple, but it includes one crucial bit: the consent checkbox. With regulations like GDPR, you absolutely need explicit consent to send marketing emails. This little checkbox keeps you compliant and builds trust through transparency. Don't skip it.
Sending Quiz Data with the Fetch API
Okay, so the user fills out the form. Now what? You need to grab all that juicy data—their name, email, answers, final score—and send it somewhere useful. This is where JavaScript’s Fetch API becomes your best friend. It lets us package up all that data and send it as a POST request to a specific URL.
Quick tip: That URL endpoint could be your own server, sure. But a much smarter and faster way is to use a webhook URL from a tool like Zapier or Make. This lets you "catch" the data and then pipe it into almost any CRM or email platform you can think of, all without writing a single line of backend code.
Here's the JavaScript that ties it all together. This function listens for the form submission, bundles up all the data into a neat object, and sends it off.
const leadForm = document.getElementById('lead-form');

leadForm.addEventListener('submit', function(event) {
    event.preventDefault(); // Stop the form from reloading the page

    const leadData = {
        name: document.getElementById('name').value,
        email: document.getElementById('email').value,
        score: score, // The final score variable from our quiz logic
        segment: getSegment(score), // A function that returns the user segment
        answers: userAnswers, // An array where you've stored the user's answers
        consentGiven: document.getElementById('consent').checked
    };

    // Replace with your actual webhook URL from Zapier, Make, etc.
    const webhookURL = 'https://hooks.zapier.com/hooks/catch/your-unique-id/';

    fetch(webhookURL, {
        method: 'POST',
        body: JSON.stringify(leadData),
        headers: {
            'Content-Type': 'application/json'
        }
    })
    .then(response => {
        if (response.ok) {
            // It worked! Hide the form and show the final results.
            document.getElementById('lead-form-container').style.display = 'none';
            document.getElementById('results-text').style.display = 'block';
        } else {
            // Something went wrong on the server side
            alert('Something went wrong. Please try again.');
        }
    })
    .catch(error => console.error('Error:', error)); // Handle network errors
});
And just like that, you've bridged the gap between your frontend quiz and your marketing backend. Once that data lands in your CRM, the door is wide open for all sorts of automated, personalised follow-ups. If you want to dive deeper into connecting these systems, our guide on marketing automation and CRM integration is the perfect next step.
Deploying and Promoting Your Quiz for Maximum Impact

You’ve built a slick html online quiz, which is a huge first step. But it’s just a clever piece of code until it's in front of your target audience. This is where the magic happens—turning your technical creation into a lead-generating machine. How and where you launch your quiz will make or break its success.
The quickest way to get started is to embed it directly into a blog post or service page with a simple iframe. This is perfect for capturing the attention of people already on your site. But if you're serious about your promotional campaigns, you need to give your quiz its own dedicated space.
Creating a High-Conversion Quiz Landing Page
A standalone landing page is a game-changer. It strips away all the noise—no navigation, no sidebars, no competing calls-to-action. It gives visitors one single thing to do: take the quiz.
You can easily host this on a subdomain like quiz.yourwebsite.com. This approach keeps the experience clean and focused, which is absolutely critical when you're paying for traffic from ads or driving clicks from an email list.
Think of this page as the sales pitch for your quiz. It needs to be irresistible.
- A Compelling Headline: Don't just say "Marketing Quiz." Try something that sparks curiosity, like "What's Your Marketing Blind Spot? Find Out in 90 Seconds."
- A Clear Call-to-Action (CTA): The button needs to scream action. "Start the Assessment" or "Discover My Score" works way better than a passive "Submit."
- Benefit-Oriented Copy: Quickly tell them why they should spend their time on this. Are they getting personalised feedback? A custom report? Make the value proposition crystal clear.
Getting this page right is non-negotiable. For some practical tips, check out these essential landing page best practices that can seriously boost your numbers.
Driving Traffic and Optimising for Conversions
Once you’re live, it’s time to open the floodgates. Blast it out on social media, feature it in your newsletter, and maybe even stick a banner on your homepage. Make it impossible for your audience to miss.
But just driving traffic isn't the whole story. You have to constantly be tweaking and improving. Start A/B testing everything—the headline, the CTA button colour, even the number of questions. You'd be surprised how a tiny change can lead to a massive lift in completions.
One of the most critical metrics to watch is the drop-off rate. If you see a ton of people bailing at question four, you've got a problem. Maybe the question is too hard, too personal, or just plain confusing. This data is gold—it tells you exactly what needs fixing.
Quizzes like this are especially powerful in markets where there’s a clear knowledge gap. Just look at the data: in 2023, while a high percentage of the global population was online, there remained a significant gap in advanced digital skills. An html online quiz that educates people on a complex topic and segments them by what they know can generate incredibly high-quality leads. For more details on this, you can explore the research on digitalisation trends and user skills in Europe on ec.europa.eu.
Your interactive quiz is a powerful lead magnet, but you need to prove its worth. If you're flying blind, a tool like Magnethive can give you a free, detailed audit of your quiz's performance and even provide AI-powered suggestions to help you get better results.
Got Questions About Building Your Quiz?
Alright, so you’re ready to move from the drawing board to actually building this thing. It's totally normal for a bunch of practical questions to pop up right about now. Getting these sorted out early will save you a ton of headaches later and make sure the quiz you build is a genuine marketing asset, not just a cool gimmick.
Let's dive into the most common questions we hear from people building their first HTML quiz from the ground up.
How Many Questions Should My Quiz Have?
Finding the sweet spot for quiz length is a delicate balance. The magic number for a high-converting html online quiz usually lands somewhere between 7 and 12 questions.
Why that range? It’s long enough to feel substantial and gather the data you need for proper segmentation, but it’s short enough that people don’t get bored and bail halfway through. If you only ask three or four questions, it can come across as a bit flimsy, making people wonder if the result is even worth their email address.
On the flip side, push it past 15 questions and you’ll watch your completion rates fall off a cliff. People just run out of steam. The trick is to be ruthless—only ask what you absolutely need to deliver a killer, personalised result. And of course, A/B testing a 7-question version against a 10-question one is the best way to see what your specific audience prefers.
Can I Really Build This Without Being a JavaScript Whiz?
Yes, you absolutely can. You don’t need to be a senior developer or a master of fancy frameworks like React or Angular to build a perfectly good HTML quiz. A solid handle on the basics—HTML, CSS, and a little bit of JavaScript—is all you need.
The core logic is simpler than you might think. It really just comes down to a few actions:
- Reacting when a user clicks an answer.
- Hiding the current question and showing the next one.
- Adding a point to a score variable.
The code snippets we walked through earlier give you a solid foundation for all this. You can literally copy and paste that structure, get the basic mechanics working, and then spend your time making it look amazing with CSS.
The great thing about starting simple is that you can always add more complexity later. Get a working version live first. You can always circle back to add fancy animations or integrations once you're generating leads.
What's the Best Way to Get People to Take My Quiz?
Don't just build it and pray they come. A great quiz deserves a real promotion strategy. You need to hit it from multiple angles to get the best results.
Start with your own turf. Feature the quiz prominently on your website's homepage, in the sidebar of your blog, and sprinkle links to it within relevant articles. An exit-intent popup can be a surprisingly effective way to catch someone's attention just as they're about to leave.
Then, take it social. Quizzes are practically made for platforms like LinkedIn, Facebook, and Instagram. Craft posts that tease the quiz and encourage people to share their results—that's where the viral magic happens. Email is another powerhouse; send it out to your list and frame it as a fun challenge. If you're in B2B, think about running targeted ads on LinkedIn that drive traffic straight to a dedicated quiz landing page.
How Do I Know if My Quiz Is Actually Working?
Success isn't just about getting completions; it's about getting the right completions. You need to track a few key metrics to get the full picture.
The number one metric, hands down, is your visitor-to-lead conversion rate. Of all the people who start your quiz, what percentage actually fill out the form at the end? That’s your money metric.
Beyond that, keep a close eye on the completion rate (finishers vs. starters). If you see a big drop-off after question four, you know there’s a problem with that specific question. You also want to track your lead-to-qualified-lead rate. This tells you if the quiz is attracting your ideal customers or just a bunch of random people.
Ultimately, it all comes back to revenue. How many of these quiz leads turn into paying customers? Set up your analytics to track the entire funnel, from the first click to the final sale. That’s how you spot the bottlenecks and truly optimise your quiz for business impact.